.

.

Tuesday, November 30, 2010

Button, Button.


So, I have this sweater that is a really pretty color blue. But it came with a waist tie, which I do not like -- the sweater still moves all over the place under the waist tie, and it's annoying! So, a few wears ago, I put a button on a safety pin through the shank, like the sweater had a button. See?

And this works, but it's rather understated. "I wonder if I could make something better..." I said to myself. I've been making these great bags that in cooperation with my friend Martie Carroll, and they have three buttons stacked on top of each other. (I'll have to take some pictures of those, too...) These stacked buttons are so
interesting, and I thought there had to be a way to make one of these to wear on clothing. You know, like on the front of this sweater with the stupid tie. So today, this is what I came up with! I found this large brown asymmetrical button at Ruby Street Quiltworks, and
I stacked another brown button on top, and a purple button on top of that!


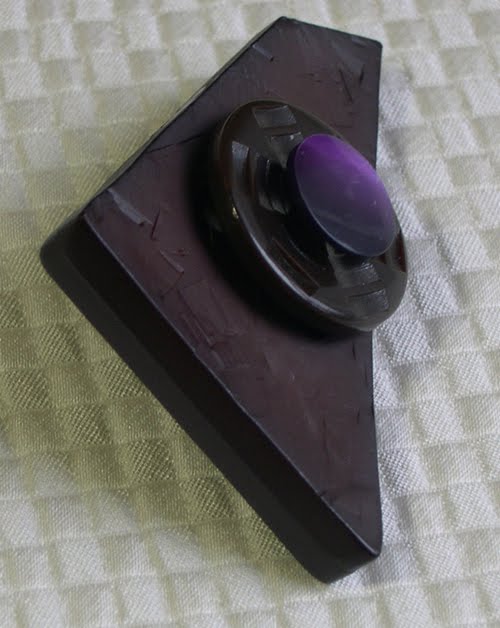
I'm pretty pleased with the result, and even though I just wore that blue sweater the other day, I just might wear it tomorrow again to try it out! I'll see if anyone notices...don't you love it when you wear something you've made, and people notice? I sure do! It's totally fun and makes it all worth it...

What do you think?


Monday, November 29, 2010

Paper + Fabric = ART!


This weekend, I went to The Scrappy Stamper in Centralia, WA to a scrapbooking crop, and I got so inspired by the awesome store, and the wonderful ladies around me!! I totally worked through a block I was having and made these two samples for a class I’ll be teaching at Ruby Street Quiltworks called Paper + Fabric = Art.

I got the idea to use fabric and paper together a while ago, and it all started with that Boo wallhanging I made for Halloween, using the Alexander Henry Haunted House and Ghastlies collections. (Well, truthfully, I got so excited, I made three!!)


But then, I got stuck, and I wasn’t sure where to go with the idea next. Until this weekend, when I got two ideas actually executed, and two or three other ideas dreamed up…take a look!


This one is of a bathing beauty. To start, I stamped the background paper with a little iridescent ink, then attached the paper to a 5”x7” canvas. The beauty (well, her head and shoulders and legs) are made of paper, and the bathtub is quilted from a design by Jennifer Garant’s fabrics for Timeless Treasures I am so happy with how it is going so far! I think this one needs a frame… Now I just need to find the perfect one!


This one turned out really well, too, I think. I quilted the
Martini Glass, which is also from Timeless Treasures

, and touched it up with some Stickles Glitter. Then, I painted a 5”x7” canvas, and muddied up the edges. I also found this great woven ribbon in red that gives some great texture. I added the words with Staz-on Ink, and my Dymo old-school label-maker.


Sigh! It was a great weekend! Thanks, Cheri Piles , for putting the crop together! Totally what I needed!

AND, I have classes scheduled at Ruby Street Quiltworks!! Last post, I was talking about my ULTIMATE Scrap Quilt, and this class will be on Thursday, January 6th. Start the new year off right by cleaning out some of your previous fabric purchases (and make room for new fabric!! J ) Then, Paper + Fabric = Art! will be on Tuesday, March 29th. (I know that March sounds like a long time away, but it will be here before we know it, I’m sure!)

I’m also working on a great sample which will become a Modern Quilting class, too!! That will be held on Thursday, April 7th, and stay tuned for pictures! I’m quite pleased with how it’s coming along!

(PS -- I figured out how to do hyper-links within a post! Click on some, and tell me how they work!! Pretty soon I'll have this blogger thing figured out, and then I'll REALLY be dangerous!! J)

Tuesday, November 16, 2010

Quilt Classes!!


I am going to be a quilt class teacher. I'm very excited!! I've done it before, but it's always nerve-wracking.

There's so much to do before a class can even be advertised! I've started to work on the samples for the classes, and it's been quite involved. First I made a mess to see what scraps of fabric I had (and what I was willing to use up :) ),

and then I cut strips and organized them into color piles: lights, mediums, yellows & reds, and darks.


Then, I sewed the strips together, and cut them AGAIN.


After that, I sewed the cut pieces together, which started to create my blocks.


I really don’t know why I thought 1” squares was a good idea, but it’s going to be awesome when I get it done. I’m still working, as you can see. It takes a good bit of time to pin all those cross-cuts together.


It did create quite a bit of tiny pieces that I was able to part with, so I think that this is good. After all this work, instead of having two bins of scraps crammed full, I have two slightly more organized bins of scraps that have room in them. You know, for more fabric…

Hopefully people will want to sign up for this class. It will be called the Ultimate Scrap Quilt (because don’t you think it is?) and it will be at Ruby Street Quiltworks, in Tumwater, Washington. It will be super fun! I can’t wait!!